
Concrete Slump Test: How to Do It and What It Means
The truck shows up, the driver asks where you want it, and somebody has to decide in the next ninety seconds whether that load is right. The concrete slump test is how you make that call with a number instead of a shrug. It takes under three minutes and it’s the cheapest quality check on the whole job.
What Is a Concrete Slump Test?
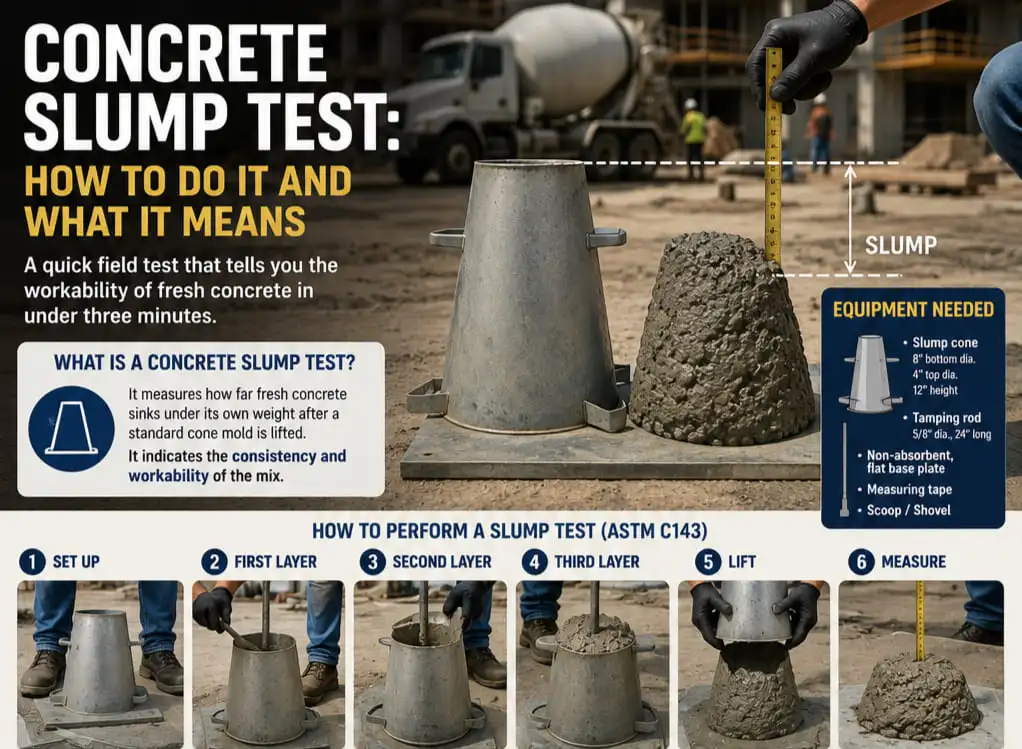
A concrete slump test measures how far fresh concrete sinks under its own weight after a standard cone mold is lifted away. The drop, measured in inches, tells you the consistency and workability of the concrete mix. In the U.S. the test is run to ASTM C143, and the result is one of a handful of fresh-concrete checks — along with air content, unit weight, and temperature – that document what actually got delivered.
It doesn’t measure strength. Slump correlates loosely with the water-cement ratio, and w/c drives strength, but the standard itself notes that a clear, consistent strength relationship doesn’t hold up under field conditions. Treat slump as a consistency check and a red flag detector, not a strength prediction.
How Do You Perform a Slump Test?
The cone is 8 inches across at the bottom, 4 inches at the top, and 12 inches tall. You’ll also need a bullet-nosed tamping rod, 5/8 inch in diameter and 24 inches long.
1. Set up. Dampen the inside of the cone and place it on a flat, rigid, non-absorbent surface away from vibration. Stand on the foot pieces to hold it down.
2. First layer. Fill to about one-third of the mold’s volume – roughly 2-5/8 inches deep – and rod it 25 times through the full depth, working spirally from the perimeter inward.
3. Second layer. Fill to about two-thirds, around 6-1/8 inches, and rod 25 more times, penetrating about an inch into the layer below.
4. Third layer. Heap the concrete above the rim, rod 25 times, and top it up if it settles below the edge. Strike off with a rolling, screeding motion of the rod.
5. Lift. Clear the spilled concrete from the base, then raise the cone straight up – no twisting, no sideways movement, over about 5 seconds (the spec allows 5 ± 2).
6. Measure. Set the inverted cone next to the specimen and measure from the top of the mold down to the displaced original center of the concrete. Record to the nearest 1/4 inch, and finish the whole test inside 2-1/2 minutes.
One thing that trips people up: aggregate larger than 1-1/2 inches has to be wet-sieved out first, or the reading is meaningless.
What Do the Slump Numbers Mean?
Higher slump means a wetter, more flowable mix. Lower means stiffer. Neither is “better” on its own – it depends on what you’re placing and how you’re consolidating it.
| Placement | Typical ordered slump |
| Mass concrete, low-workability footings | 1-3 in |
| Pavements and slabs on grade | 3-5 in |
| Foundation walls and footings | 3-4 in |
| Reinforced walls, beams, columns | 4-6 in |
| Pumped or congested-rebar placements (with admixtures) | 6-9 in |
These are common ranges, not code. Your project spec and mix design win every time.
Reading the Shape, Not Just the Number
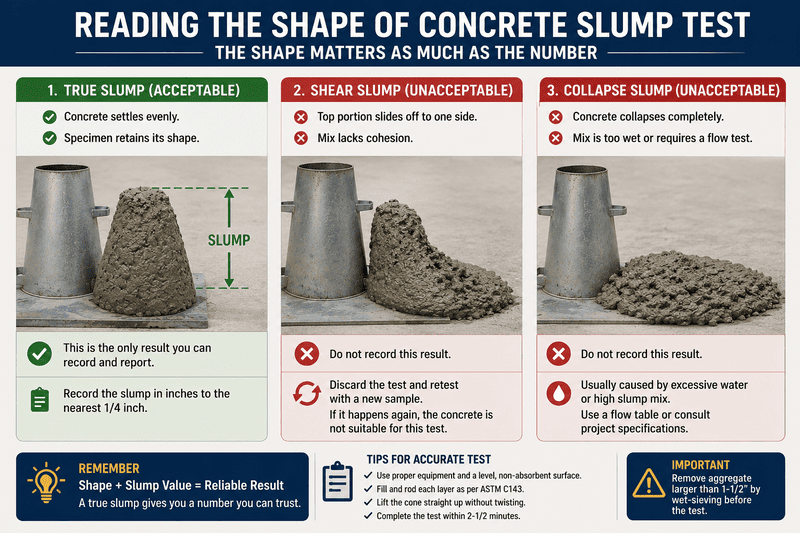
Three things can happen when the cone comes off:
True slump: the mass settles evenly and keeps its shape. This is the only result you can actually record.
Shear slump: the top half slides off to one side. The mix is short on cohesion. Discard it and retest a fresh portion; if you get a second shear, the concrete isn’t suitable for the test at all.
Collapse slump: it flattens out completely. Usually far too much water, or a mix that needs a flow test instead.
Should You Add Water to Fix a Low Slump?
No – not without the supplier’s number and the spec in front of you. The working rule of thumb is one gallon per cubic yard for a 1-inch slump increase, and ASTM C94 requires 30 more drum revolutions at mixing speed after any water is added. That same gallon may cost you roughly 150-200 psi of compressive strength depending on cement content, and it raises the cracking risk.
Five gallons a yard to rescue a stiff load can push a 4,000 psi design below where the engineer will accept it. If the mix needs to move better, ask for a water reducer, not a hose. Water is genuinely the most expensive ingredient you can add on site.
Frequently Asked Questions
Is the slump test the same as a strength test?
No. The slump test measures the consistency and workability of fresh concrete. Compressive strength is measured separately by casting cylinders and breaking them, usually at 7 and 28 days.
What is a good slump for a concrete driveway?
Most residential slabs and driveways are placed at 3-5 inches of slump. Stiffer mixes are hard to finish by hand; wetter ones shrink and crack more.
How often should slump be tested on a pour?
Test the first load, then at the frequency your project specification or inspector requires – commonly with every set of strength cylinders, and any time a load looks visibly different from the last one.
Can you lower the slump of concrete on site?
Not practically. You can raise slump by adding water or admixture, but you can’t take water back out. Order low and adjust up.
Is a zero slump reading a failure?
Not always. Roller-compacted concrete and precast products are designed at near-zero slump because they’re consolidated by vibration equipment. On a hand-finished residential pour, though, a reading under 1 inch means the mix is too dry.
Before the Truck Backs Up
Have the cone, rod, plate, and tape ready before the mixer arrives – not while the driver is waiting. A three-minute test costs nothing. Ripping out a slab that was watered down to make finishing easier costs a great deal.